How to Map and Label Your Electrical Panel: An Electrician's Guide to Labels That Actually Work (2026)
The first time you truly need your electrical panel to make sense, you will be in a hurry. A burning smell. A dead outlet feeding a freezer. Water creeping toward something plugged in. You will open that gray door expecting a map - and most houses hand you a lie: six breakers labeled LIGHTS, two labeled PLUGS, one heroic MISC, and a bedroom that somehow got labeled twice. Then comes the guesswork, and guesswork is exactly what you cannot afford in an emergency.
I have spent more than seven years maintaining critical-infrastructure power systems, where every circuit is labeled, verified, and re-verified - because the person reading the label is often working against a clock. Houses run on identical principles, just smaller. The difference between a professional panel and a homeowner panel is rarely the breakers. It is the documentation.
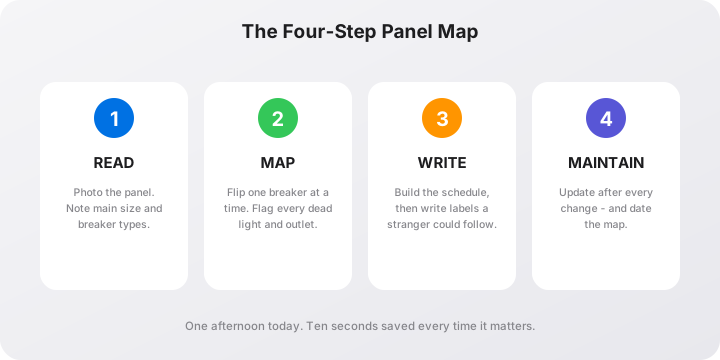
Here is the part that surprises people: this is not a cosmetic complaint. The National Electrical Code (Article 408.4) requires every circuit to be legibly identified as to its clear, evident, and specific purpose. A directory that says LIGHTS for six breakers does not meet that standard, and it is the single most common defect I find in a walkthrough. But codes aside, the practical case is simpler: a panel label is the control interface for everything wired in your house. This guide is the method I would run at my own mother’s house - read the panel, map every circuit, write labels a stranger could follow, and read what the exercise reveals about your electrical system.
Why This Is Worth an Afternoon (The Real Stakes)
A labeled panel is one of those things nobody values until the ten seconds when it matters. Here is where a good map pays for itself:
The emergency moment. A leak near an outlet, arcing in a switch, or a burning smell needs a circuit killed now. With a real map you cut it in seconds. With LIGHTS x6 you start flipping everything - possibly killing medical equipment, a freezer, or a server while hunting for the right one. The map’s first job is telling you what you are about to kill before you kill it.
Every service call. Electricians bill by the hour. When a customer hands me an accurate circuit number, the job starts at the right breaker. When the panel says MISC, I spend part of that hour at the panel hunting. Good labels are literally money saved.
Storm and outage time. When the power comes back and something must be shed - or when a generator or battery needs a clean set of circuits to carry - knowing exactly which breaker feeds what turns five minutes of panic into a thirty-second decision. House-wide outage plans live in our power outage preparation guide, but every one of them assumes you know your circuits.
Adding anything new. An EV charger, a heat pump, a workshop outlet: the first question is always what the panel has to spare. The people who know their panel find out in a minute; the people who do not pay someone else to find out. Our EV charger cost guide shows how load and panel capacity drive those numbers, and the panel upgrade cost guide covers what a service upgrade costs when the answer is no.
Resale and inspections. A panel full of LIGHTS and ??? shows up in inspection reports. A dated, specific directory quietly signals that the house was maintained by someone who cared.
A panel is not just a box of switches. It is a document that happens to switch power - and documents get kept current.
Ground Rules: What You Can Safely Do Yourself
Labeling and mapping is the rare electrical project that lives entirely on the safe side of the panel door. Everything here is something a careful homeowner can do with zero tools inside the box:
- Open the panel door. That is as far as you ever go unlicensed. Never remove the inner cover (the deadfront). Behind it sit the incoming service lugs, which remain energized even with the main breaker off - that is precisely why panel work belongs to licensed hands.
- Flipping breakers is safe. That is the whole mechanic of mapping: one breaker off, observe, back on. You are not weakening breakers by switching them (they are built for thousands of operations).
- But respect what you switch off. A few loads deserve scheduling:
- Fridges and freezers - keep doors closed; an unopened fridge holds safe temperature for about 4 hours and a full freezer for about 48, so a mapping afternoon is no risk. Know it anyway.
- Sump pumps - map that circuit on a dry day, and restore it immediately. Never leave a sump pump circuit off while you wander the house.
- Medical equipment - map with the user aware, or when backup is available.
- Computers and servers - save work first, or map when nobody is working.
Do the job in dry weather, ideally in the evening when lighting is obvious (or daytime with a helper). A phone flashlight and painter’s tape are the entire kit. And one warning that has earned its place in this guide: if you find water where it should not be, or a burning smell - stop mapping. That is not a labeling problem anymore. Our breaker triage guide covers what those symptoms are telling you.
Step 1: Read the Panel First (Ten Minutes)
Before flipping anything, take a picture and take inventory. Open the door, photograph the whole face, and note:
The main breaker size. A big breaker at the top (or a service sticker) tells you the service size: 100A, 150A, 200A. Write it down - every future capacity question starts here.
The spaces. Count breakers and count blanks. A panel with zero spare spaces changes how you plan any addition; a panel with six blanks is an open runway.
The breaker types. A five-minute read of the panel face, decoded:
| What you see on the panel | What it is | Why it matters to you |
|---|---|---|
| Single handle, 15A or 20A | Single-pole breaker: one 120V circuit | The bulk of your house. 15A protects 14-gauge wire, 20A protects 12-gauge |
| Two handles joined by a bar (30/40/50A) | Double-pole breaker: one 240V circuit | Dryer, range, water heater, A/C, EV charger - the big loads |
| Two thin handles sharing one slot | Tandem/twin breaker: two circuits in one space | A sign the panel ran out of room; proper only where the panel is listed for it |
| A small TEST button on the face | GFCI, AFCI, or dual-function breaker | Safety devices, not extras - press TEST regularly. (See our GFCI vs AFCI guide.) |
| A blank slot with no breaker | Spare capacity | These decide what you can add later without a panel change |
| Round screw-in fuses instead | A fuse box, not a modern panel | Old service equipment - worth an electrician’s evaluation before adding any load |
The second panel. Garages, basements, shops, and outbuildings often hide a subpanel fed from the main. If one exists, it gets its own column in your map - and its feeder breaker in the main panel gets labeled too.
The existing labels. Read them all before trusting them. In my experience, expect to keep maybe half. Assume nothing until verified.
Step 2: Map Every Circuit (Three Methods, Pick Your Mix)
Mapping means answering one question for every breaker: what actually goes dead when this one is off? Three methods get you there, and most people use a blend.
| Method | Best for | Time | Cost | The catch |
|---|---|---|---|---|
| 1. The sweep - flip and walk | Lights, hardwired loads, everything | 2-4 hours for a house | Free | You must physically check every room, every time |
| 2. Circuit breaker finder | Outlets, one at a time | Minutes per outlet | About $30-60 | Outlet circuits only; long runs can bleed onto nearby breakers |
| 3. The radio trick | One outlet you need right now | 5-10 minutes | Free | One circuit at a time; needs a noise source |
Method 1: the sweep. The most thorough and the one that catches hardwired loads. Do it one breaker at a time: flip a breaker off, walk the house, and flag everything dead with a sticky note or painter’s tape. Check the boring places - the garage, the porch, the outdoor outlets, the closet with the furnace. Then return, restore, and write it all down before moving to the next breaker. It is slow, and it is the only method that finds light circuits, smoke detector interconnects, and the furnace. A helper halves the time: one person watches rooms while the other flips, or you keep a phone call open between the two of you.
Hardwired loads do not have a plug to test, so catch them by ear and eye: flip candidates while the A/C condenser is running (you will hear it stop), watch the thermostat display for the furnace, and check the water heater’s indicator. Restore those promptly - they are the loads you least want left off.
Method 2: the breaker finder. The professional shortcut for outlets. You plug a transmitter into the outlet and sweep a receiver down the panel - the right breaker chirps. It turns an hour of walking into two minutes per outlet, which makes it perfect for the outlets that matter most: the fridge, the garage freezer, the home office, outdoor receptacles. A circuit breaker finder is the one tool this project justifies buying, because you will use it every time anything electrical changes.
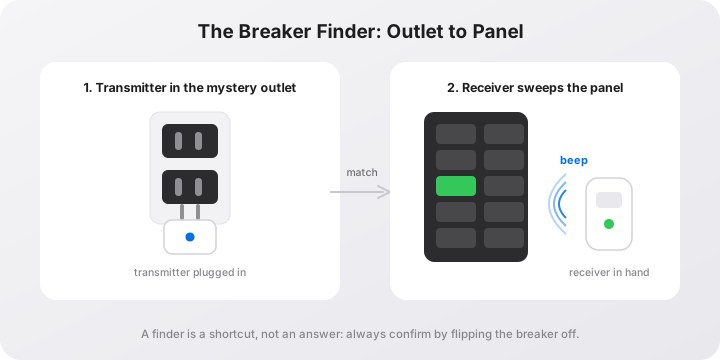
Two caveats keep it honest. First, it works on energized circuits and identifies outlets - it will not find lighting circuits (worth borrowing a light-socket adapter if the kit includes one). Second, on long runs the signal can bleed onto a neighbor breaker. So never write down a find without confirming: flip the candidate off and verify the outlet is dead.
Method 3: the radio trick. The old standby. Plug something loud - a radio, a portable speaker, a hair dryer on high - into the mystery outlet, then flip breakers until the noise stops. Best for the “I am standing here right now and need to know” moment, like before unplugging a fridge to move it.
Expect surprises. Circuits rarely respect room boundaries, and that is exactly why the map is worth making:
- A garage outlet sharing a bedroom circuit, or the porch outlets riding a bathroom circuit
- “LIGHTS” breakers that own half the house, including outlets you would never guess
- Split receptacles: the top and bottom halves of one outlet on different breakers (test both when you sweep)
- Doorbell transformers, irrigation timers, and bath fans hidden on unrelated circuits
- Subpanel circuits that trace back through the subpanel’s main - map both levels
When every breaker has a written description and no surprises remain, the mapping is done.
Step 3: Write It Down (The Panel Schedule)
The schedule is the master document; the panel labels are a copy of it. Build it first, on paper or in a notes app, and format it the way panels are read:
| # | Amps | Circuit serves | Notes |
|---|---|---|---|
| 1 | 15 | Bedroom 1 outlets + closet light | |
| 2 | 15 | Bedrooms 2 + 3 outlets, hall light | |
| 3 | 20 | Bathroom outlets (GFCI) + exhaust fan | Press TEST monthly |
| 4 | 20 | Kitchen counter left (GFCI) + microwave | |
| 5 | 20 | Kitchen counter right (GFCI) | |
| 6 | 15 | Kitchen + dining lights, doorbell transformer | |
| 7 | 20 | Fridge + garage freezer | SENSITIVE - do not flip by accident |
| 8 | 15 | Living room outlets + TV | |
| 9 | 15 | Living room + porch lights | Porch outlets included |
| 10 | 20 | Garage outlets + workbench | |
| 11 | 20 | Laundry outlets (GFCI) + sump pump | SENSITIVE - dry days only |
| 12 | 30 | Dryer (240V, double-pole) | |
| 13 | 50 | Range (240V, double-pole) | |
| 14 | 15 | Furnace + thermostat | |
| 15 | 40 | A/C condenser (240V, double-pole) | |
| 16 | 15 | Spare | Empty slot |
Numbering. If the panel prints factory circuit numbers, use them. If not, adopt the standard convention - odd numbers down the left column, even down the right, counting from the top - and write the convention on the directory so it stays obvious.
Copies, plural. The paper version lives inside the panel door. A photo goes on your phone and into the cloud, because “which breaker is the dishwasher” is a question people text each other. The digital copy is the one you update first; the paper follows after the next panel visit.
Date it. “Mapped 10/2026” tells future-you how much to trust the document. Add a line whenever a circuit changes: “2027-03: added EV charger, circuit 17.”
Step 4: Labels That Work (The Craft Part)
Now transfer the schedule onto the panel directory - and this is where most panels go wrong, because people label categories instead of circuits.
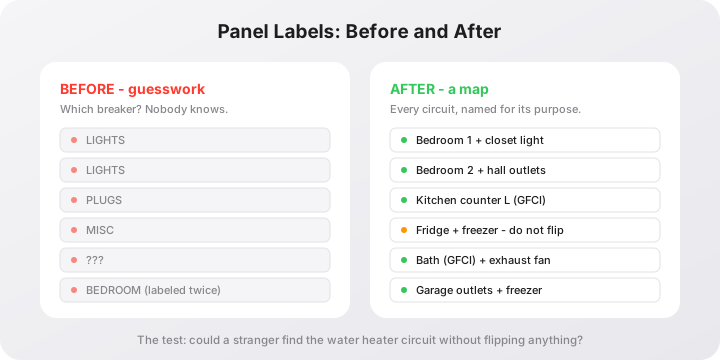
The test of a good label: hand the panel to a stranger - or to yourself at 2 a.m. - and see whether they can find the water heater circuit without flipping anything. Three rules get you there:
Name rooms and loads, not categories. A quick translation table:
| Instead of | Write | Because |
|---|---|---|
| LIGHTS | Bedroom 1 + closet, hall sconce | ‘Lights’ on six breakers tells you nothing |
| PLUGS | Living room outlets, north wall | You search by room, not by device type |
| MISC | (finish the map - there is no MISC) | An unmapped circuit is an unknown risk |
| KITCHEN | Kitchen counter left (GFCI) | A kitchen holds four or more circuits; be specific |
| HEATER | Bathroom - heater + exhaust fan | Multiple heaters exist in one house; name the room |
Always flag sensitive loads. If a stranger flipping breakers could spoil food, flood a basement, or cut a medical device, that word goes right on the label. This single habit prevents the most expensive mislabels.
Keep it legible and short. Specificity is not the same as essays - “GFCI outlet next to the toaster” is as useless as “PLUGS” when it does not fit. Use one consistent abbreviation style and, if you use codes beyond the obvious, tape a tiny key at the top of the directory.
For materials, two options earn their place:
- A label maker with laminated tape - the professional-looking choice that survives decades of heat and dust.
- A fine-point permanent marker directly on the directory card - simple, fine, and dramatically better than pencil, which fades to a rumor within a few years.
Never use masking tape (it dries, curls, and falls off exactly when you need it), and keep pencil off the panel entirely. One more placement rule: do not cover the manufacturer’s printed information - torque tables, wiring diagrams, and warnings on the inside of the door are reference material for every future electrician. Label around them, not over them. If you label individual breaker faces, keep stickers clear of handles and TEST buttons. The directory is the primary home for labels; everything else is decoration.
What Mapping Exposes (Read Your Panel Like a Pro)
The real payoff of this project is not the labels - it is what you learn while making them. A fourteen-year-old panel tells its story to anyone who maps it carefully, and some of what you find deserves follow-up. Run the discovery list:
| What the map reveals | What it usually means | What to do |
|---|---|---|
| The whole kitchen runs on one 20A circuit | Older or budget wiring; code wants two or more countertop circuits | Fine for now; plan a new circuit before adding countertop appliances |
| Sump pump shares a circuit (or sits on a GFCI that trips) | One nuisance trip from a flooded basement | Highest-value fix in the house: a sump pump battery backup and eventually a dedicated circuit |
| Fridge or freezer on a shared circuit that has ever nuisance-tripped | Spoiled food waiting for a schedule | Test the GFCI, mention it to your electrician, keep the label explicit |
| All bedrooms + hall on one 15A circuit | Normal for older homes; guarantees overload season with space heaters | Respect the 80% rule (the triage guide explains it); a new circuit is the real fix |
| No GFCI devices in bathrooms, kitchen, garage, or outdoors | Pre-1970s wiring, or removed devices | Check with an outlet tester; upgrade the gaps (see GFCI vs AFCI) |
| Tandems everywhere, zero spare slots | The panel is full - and any big addition needs load math | Have the capacity conversation before buying the EV or heat pump, not after |
| A breaker noticeably warm, burnt smell, or discoloration | The slow-failure category: loose connection or failing breaker | Stop using the circuit and read the triage guide; do not wait for it to settle |
| Dull-silver wire or AL markings spotted during any panel visit | Aluminum branch wiring (roughly 1965-1973 homes) | Identification and options in our aluminum wiring guide |
| Outdoor outlets with broken covers, no GFCI | Trips after every storm; shock risk | Upgrade outlets and in-use covers; keep outdoor circuits on your storm checklist |
| Round fuses, no main breaker, or a split-bus panel | Old service equipment | Electrician evaluation before adding any new load |
What the panel cannot tell you. A few things live behind the deadfront and only a licensed electrician should check them: double-tapped breakers (two wires under one terminal), shared-neutral multiwire circuits, loose terminations, and whether the wire gauge actually matches each breaker. Fold those checks into your next service call or a pre-purchase inspection - and if the house is new or new to you, our new construction inspection checklist shows where they fit.
The output of this section is two lists: fix now (anything warm, charred, or unprotected near water) and plan later (capacity upgrades, dedicated circuits, service size). The map makes both honest.
Five Mistakes That Waste the Afternoon
- Mapping half the panel and planning to finish later. You will not. The unlabeled half stays a mystery for another five years. One pass, whole panel.
- Writing labels from memory. “I know the second bedroom is circuit 12” - it is not. Every entry gets confirmed by a flipped breaker, or it does not get written.
- Skipping the invisible stuff. Switches, smoke detector circuits, outdoor outlets, and the doorbell transformer are exactly the circuits you cannot find later without the map. Catch them now.
- Labeling for yourself instead of a stranger. Future-you has forgotten everything. An inspector, a buyer, a house-sitter, and an electrician know nothing. Write for them.
- Over-precision. A label nobody can read without a magnifier is not more useful than LIGHTS. Short, consistent, legible beats exhaustive every time.
Before you start, a headlamp beats holding a phone in your teeth at the panel - small thing, real difference.
When to Call an Electrician
Everything in this guide is homeowner territory. Hand the rest to a licensed electrician without guilt:
- Anything behind the panel cover - removing it, adding circuits, replacing breakers
- A breaker that is warm, trips repeatedly, or shows discoloration (start with the triage guide, then call)
- Aluminum branch wiring (it needs a specialist’s eye for remediation options)
- A fuse box, split-bus panel, or any service equipment older than the house’s last renovation
- Any capacity question that starts with “can I add” - EV charger, heat pump, workshop, hot tub
- During any such visit: ask them to update the panel labels before they leave. Thirty seconds of their time, years of yours.
The Bottom Line
A panel that says LIGHTS and MISC is a control system nobody can operate - including, eventually, you. The fix costs one afternoon and zero permits: read the panel, map every breaker by flipping and verifying, write a schedule, and transfer it to labels a stranger could follow. Then keep it current, because a map is only as good as its last update.
Every professional power system I have ever maintained was documented, verified, and re-verified. Not because the labels are beautiful - because the moment you need them is the moment you cannot afford to guess. Your house deserves the same standard. One afternoon now buys you the ten seconds that matter later.
Frequently Asked Questions
How do I find out which breaker controls an outlet?
The fastest tool is a circuit breaker finder (about $30-60): plug the transmitter into the outlet, sweep the receiver across the panel, and the right breaker announces itself with a chirp. Confirm every find the old-fashioned way - flip that breaker off and check that the outlet is actually dead before you write it down. No finder? Two free methods work: leave something loud running on the outlet (a radio, or a hair dryer on high) and flip breakers until it goes quiet, or sweep the house one breaker at a time and flag what dies. The one rule for all three methods: verify by flipping, never by memory.
What should I write on my electrical panel labels?
Room plus what it serves, in the fewest words that leave no doubt: 'Bedroom 2 outlets + closet light', 'Kitchen counter left (GFCI)', 'Garage outlets + freezer'. Three rules cover almost every case. Never write only a category - LIGHTS, PLUGS, and MISC are non-labels; if a circuit serves three rooms, name the rooms. Always name sensitive loads (fridge, freezer, sump pump, medical equipment) right on the label, because that is the word that prevents an expensive mistake. And keep one consistent abbreviation style, with a small key taped inside the door if you use codes beyond the obvious ones.
Can I label my electrical panel myself, or does an electrician have to do it?
You can do all of it yourself, and you should. Everything in this guide happens outside the panel: reading labels, flipping breakers, plugging a finder into outlets, writing on the directory. No cover removal, no wiring, nothing that needs a license - and it is the rare electrical task that is genuinely homeowner-safe from start to finish. What does need an electrician is everything behind the door: removing the inner cover (the incoming service lugs stay live even with the main breaker off, which is exactly why that panel belongs to licensed hands), adding or moving circuits, replacing breakers, and anything that shows heat, charring, or a burning smell.
My panel says LIGHTS, but it killed my fridge. What do I do?
That is a mislabel, and it is common - especially in garages and older houses, where the fridge or freezer quietly shares a lighting circuit. Get power restored, then check the food: USDA guidance gives an unopened fridge about 4 hours before perishables are at risk, and a full freezer about 48 hours (24 if it is half full). Once the food question is settled, fix the record: map that circuit properly and write the fridge or freezer on the label in a way nobody can misread. If it keeps happening - or the circuit is crowded - ask an electrician about a dedicated circuit. And from then on, check the label before you flip anything: this exact scenario is why the map exists.
How often should electrical panel labels be updated?
Every time the electrical system changes: a circuit added, a kitchen remodeled, solar or an EV charger installed, a breaker replaced, a subpanel added - and once more when you move into a house you did not wire. Make it automatic: after any electrical work, before the electrician packs up, have them tell you the exact circuit and update the label on the spot. It takes thirty seconds then and saves an hour of guesswork later. Date the directory ('updated 10/2026') so the next person - you in five years, an inspector, a buyer - knows how fresh the map is. A panel label is a maintenance record, not a one-time craft project.