Generator Transfer Switch: Types, Costs, and Installation Guide (2026)
If you are going to connect a portable generator to your house — not just run extension cords through a window — you need a transfer switch. Not a double-male suicide cord. Not backfeeding the dryer outlet. A real, code-compliant transfer switch or interlock kit.
I have installed both manual transfer switches and interlock kits, and I have also seen the aftermath when people skip this step. The most common failure mode is not the equipment — it is someone wiring a generator directly into their panel with no isolation from the grid. When grid power returns, the generator and the transformer fight each other. The generator loses. Violently.
This guide covers the two paths, what each costs, and what the installation actually involves.
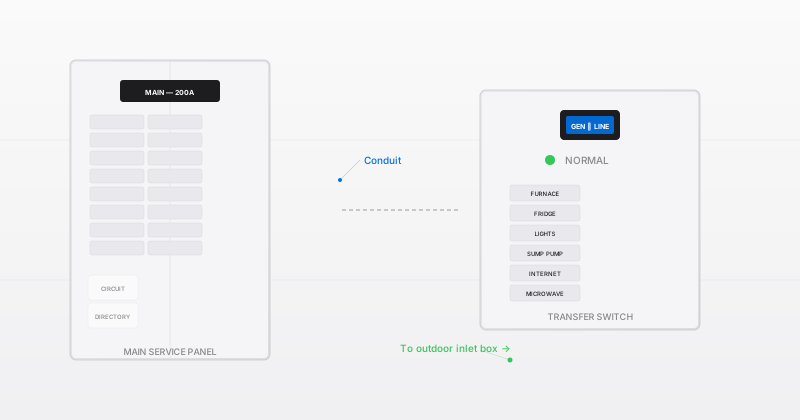
Manual Transfer Switch vs Interlock Kit: The Real Difference
Both devices serve the same purpose — letting generator power feed your home circuits while guaranteeing the main breaker is OFF. But they work differently, and the right choice depends on your panel and your budget.
<!-- TS sub-panel -->
<rect x="260" y="35" width="170" height="230" rx="12" fill="#ffffff" stroke="#ff9500" stroke-width="1.5"/>
<rect x="260" y="35" width="170" height="32" rx="12" fill="#ff9500" opacity=".12"/>
<rect x="260" y="55" width="170" height="12" fill="#ff9500" opacity=".12"/>
<text x="345" y="56" text-anchor="middle" font-family="system-ui" font-weight="600" font-size="12" fill="#ff9500">TRANSFER SWITCH</text>
<!-- TS circuit breakers -->
<rect x="272" y="78" width="56" height="24" rx="4" fill="#ff9500" opacity=".1" stroke="#ff9500" stroke-width=".8"/>
<text x="300" y="94" text-anchor="middle" font-family="system-ui" font-size="9" fill="#ff9500">Furnace</text>
<rect x="340" y="78" width="56" height="24" rx="4" fill="#ff9500" opacity=".1" stroke="#ff9500" stroke-width=".8"/>
<text x="368" y="94" text-anchor="middle" font-family="system-ui" font-size="9" fill="#ff9500">Fridge</text>
<rect x="272" y="110" width="56" height="24" rx="4" fill="#ff9500" opacity=".1" stroke="#ff9500" stroke-width=".8"/>
<text x="300" y="126" text-anchor="middle" font-family="system-ui" font-size="9" fill="#ff9500">Lights</text>
<rect x="340" y="110" width="56" height="24" rx="4" fill="#ff9500" opacity=".1" stroke="#ff9500" stroke-width=".8"/>
<text x="368" y="126" text-anchor="middle" font-family="system-ui" font-size="9" fill="#ff9500">Sump</text>
<rect x="272" y="142" width="56" height="24" rx="4" fill="#ff9500" opacity=".1" stroke="#ff9500" stroke-width=".8"/>
<text x="300" y="158" text-anchor="middle" font-family="system-ui" font-size="9" fill="#ff9500">Router</text>

<!-- GEN breaker in TS -->
<rect x="272" y="180" width="56" height="24" rx="4" fill="#34c759" opacity=".15" stroke="#34c759" stroke-width="1.2"/>
<text x="300" y="196" text-anchor="middle" font-family="system-ui" font-weight="600" font-size="9" fill="#34c759">GEN FEED</text>

<!-- Labels -->
<text x="345" y="235" text-anchor="middle" font-family="system-ui" font-size="9" fill="#86868b">Only selected circuits</text>
<text x="345" y="250" text-anchor="middle" font-family="system-ui" font-size="9" fill="#86868b">powered during outage</text>

<!-- Arrow main→TS -->
<path d="M235 150 L255 150" stroke="#86868b" stroke-width="1.5" marker-end="url(#arrowGray)"/>
<defs>
  <marker id="arrowGray" markerWidth="6" markerHeight="6" refX="5" refY="3" orient="auto">
    <path d="M0,0 L6,3 L0,6" fill="#86868b"/>
  </marker>
</defs>
<!-- All breakers -->
<rect x="42" y="82" width="56" height="24" rx="4" fill="#f5f5f7" stroke="#d2d2d7" stroke-width=".5"/>
<rect x="110" y="82" width="56" height="24" rx="4" fill="#f5f5f7" stroke="#d2d2d7" stroke-width=".5"/>
<rect x="42" y="112" width="56" height="24" rx="4" fill="#f5f5f7" stroke="#d2d2d7" stroke-width=".5"/>
<rect x="110" y="112" width="56" height="24" rx="4" fill="#f5f5f7" stroke="#d2d2d7" stroke-width=".5"/>

<!-- Main breaker OFF (slid down by interlock) -->
<rect x="42" y="145" width="120" height="28" rx="5" fill="#0071e3" opacity=".12" stroke="#0071e3" stroke-width="1.5"/>
<text x="102" y="163" text-anchor="middle" font-family="system-ui" font-weight="600" font-size="12" fill="#0071e3">MAIN — OFF</text>

<!-- GEN breaker ON -->
<rect x="42" y="180" width="120" height="28" rx="5" fill="#34c759" opacity=".15" stroke="#34c759" stroke-width="1.5"/>
<text x="102" y="198" text-anchor="middle" font-family="system-ui" font-weight="600" font-size="12" fill="#34c759">GEN — ON</text>

<!-- Interlock sliding plate -->
<rect x="72" y="155" width="14" height="55" rx="2" fill="#86868b" opacity=".8"/>
<text x="166" y="170" font-family="system-ui" font-size="8" fill="#86868b">Sliding</text>
<text x="166" y="180" font-family="system-ui" font-size="8" fill="#86868b">plate</text>

<!-- Labels -->
<text x="130" y="235" text-anchor="middle" font-family="system-ui" font-size="9" fill="#86868b">Every circuit accessible</text>
<text x="130" y="250" text-anchor="middle" font-family="system-ui" font-size="9" fill="#86868b">Must manually balance load</text>
How a Transfer Switch Works
A transfer switch is a sub-panel installed next to your main panel. You move the circuits you want to power during an outage — typically the furnace, refrigerator, sump pump, a few lights, and your internet gear — from the main panel into the transfer switch.
When the power goes out, you walk to the panel, flip the transfer switch from LINE to GEN, start your generator, and the selected circuits come alive. The key mechanism: it is physically impossible for the main breaker and generator breaker to be ON at the same time. This is not software; it is a mechanical interlock built into the switch.
How an Interlock Kit Works
An interlock is a sliding metal plate mounted on the front of your existing panel cover. It physically blocks the generator breaker from being turned ON while the main breaker is ON — and vice versa. You must turn one OFF before the other can be turned ON.
This gives you access to every circuit in your panel during an outage — you are not limited to a handful of pre-selected circuits. However, you must manually manage your load. A 5,000W generator cannot run your air conditioner, electric water heater, and oven simultaneously.
The Comparison Table
| Feature | Transfer Switch | Interlock Kit |
|---|---|---|
| Unit cost | $300–800 | $50–150 |
| Installed cost | $700–1,600 | $400–800 |
| Circuits accessible | Only pre-selected (6–10 typically) | Every circuit in the panel |
| Load management | Automatic (only wired circuits draw) | Manual (you must choose what to run) |
| Panel compatibility | Universal | Requires specific panel model support |
| Local code acceptance | Universal | Some jurisdictions ban them |
| Generator inlet box required | Yes | Yes |
| Aesthetic | Second box on the wall | Single panel, clean look |
Automatic Transfer Switch (ATS): When You Have a Standby Generator
If you have a permanently installed standby generator — the kind that runs on natural gas or propane and looks like a central AC unit — you need an automatic transfer switch. When the ATS detects a grid outage, it automatically starts the generator and switches the house over, typically within 10-30 seconds. When grid power returns, it switches back and shuts the generator down after a cool-down period.
Automatic transfer switches are significantly more expensive ($500-2,000 for the switch, $1,300-3,500 installed), but they are the only option that works unattended. If you travel frequently or have medical equipment that cannot lose power, an ATS with a standby generator is the answer.
For everyone else — the person with a portable generator in the garage — a manual transfer switch or interlock kit is the practical, code-compliant solution.
Parts You Need for Any Transfer Switch Installation
Whether you choose a transfer switch or interlock kit, these additional parts are required:
| Part | Purpose | Approximate Cost |
|---|---|---|
| Generator inlet box | Weatherproof receptacle mounted outside where you plug in the generator cord | $35–80 |
| Generator cord | Heavy-gauge cord from generator to inlet box (typically 25-50 ft) | $50–150 |
| 2-pole breaker | For the generator feed in your panel (size matches generator outlet: 30A or 50A) | $15–40 |
| Conduit and fittings | To run wiring from the inlet box to the panel | $20–60 |
| 10/3 or 6/3 wire | Indoor-rated cable for the generator feed (gauge depends on amperage) | $2–8/ft |
| Permits | Required in most jurisdictions | $50–200 |
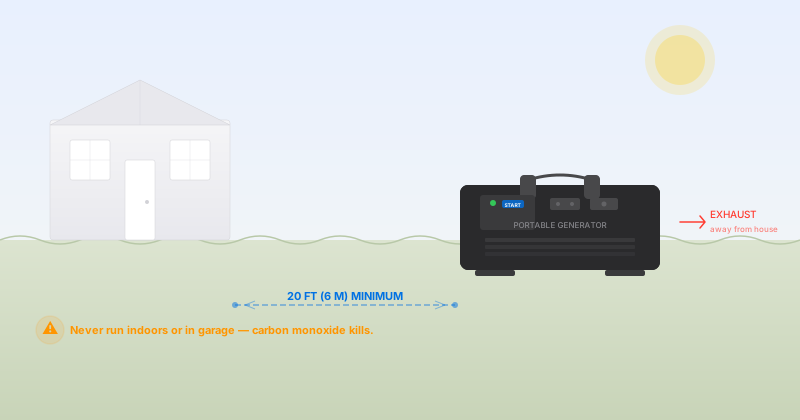
The generator inlet box must be outside. This is non-negotiable. Running a generator inside a garage or basement — even with the door open — kills people. Carbon monoxide does not care about the door being open. The inlet box goes on an exterior wall, and the generator stays at least 20 feet from the house, exhaust pointing away.
Installation Overview: What the Electrician Actually Does
I am not going to give you a step-by-step wiring guide here — if you are qualified to do this work, you already know how to read a wiring diagram. But understanding what the electrician does (or what you are getting into if you DIY) helps you spot corners being cut.
For a Transfer Switch Installation
- Mount the transfer switch next to the main panel. It needs its own wall space — typically a 14-inch-wide box.
- Move selected circuits from the main panel to the transfer switch. Each circuit’s hot and neutral get extended (wire-nutted) into the transfer switch breakers.
- Run the generator feed from the transfer switch to the outdoor inlet box via conduit. This is usually 10/3 NM-B cable for a 30A feed.
- Connect the inlet box on the exterior wall. It looks like a round, weatherproof outlet — similar to an RV hookup.
- Ground and bond correctly. The transfer switch must bond neutral and ground only at the main panel, not at the generator. This trips people up and is the most common inspection failure.
For an Interlock Kit Installation
- Verify panel compatibility. The interlock kit must be listed for your specific panel model. Square D, Siemens, Eaton, and GE all have factory interlock kits for their popular panels.
- Install the generator breaker in the top-right slot of the panel (the location the interlock is designed to block).
- Mount the interlock plate on the panel cover. It must slide freely and engage both the main breaker and generator breaker.
- Run conduit to the inlet box — same as the transfer switch method.
- Label the panel clearly. The interlock must have a permanent label stating the operating sequence, per NEC 702.7.
Transfer Switch Sizing: 30A vs 50A vs 100A
The amperage of your transfer switch limits how much generator power can enter your home:
| Transfer Switch Rating | Max Generator Size | Typical Use |
|---|---|---|
| 30A (7,200W at 240V) | Up to 7,500W | Furnace, fridge, sump pump, lights, router, TV |
| 50A (12,000W at 240V) | Up to 12,500W | Above + well pump, microwave, window AC, small water heater |
| 100A (24,000W at 240V) | Up to 20,000W+ | Whole-house with standby generator and ATS |
For the typical homeowner with a 5,000-7,500W portable generator, a 30A transfer switch is the sweet spot. It covers the essentials — furnace, fridge, sump, lights, internet — without being oversized. The 50A units add cost and require heavier-gauge wire (6 AWG instead of 10 AWG) which is more difficult to work with.
If you are planning for a future standby generator, size up. But if this is for a portable generator that sits in the garage 360 days a year, 30A is all you need.
Code Requirements and Common Inspection Failures
I have been on site for enough electrical inspections to know what gets flagged. Here is what matters:
NEC 702.5 — Transfer equipment shall prevent inadvertent interconnection. This is the core requirement. The transfer switch or interlock must make it mechanically impossible for generator power and utility power to meet.
Inlet box location. Must be outdoors, must be weatherproof while in use (an “in-use” cover, not just a flap), and must be clearly labeled “GENERATOR CONNECTION.”
Grounding. The generator is a separately derived system only if the transfer switch switches the neutral. Most residential transfer switches do not, which means the generator uses the house grounding system. If your generator has a bonded neutral (most portable generators do), you need to either unbond it or use a transfer switch that switches the neutral. This is a known gotcha — search “generator bonded neutral transfer switch” for the specifics of your equipment.
Working clearance. NEC 110.26 requires 36 inches of clear working space in front of the panel. Mounting a transfer switch does not change this; the clearance applies to both.
GFCI requirement. Generators 15kW and smaller now require GFCI-protected outlets per NEC 445.20. However, GFCI on the generator can cause nuisance tripping when connected to a transfer switch due to the way neutral and ground interact. This is an ongoing industry headache with no universally accepted solution yet. If your generator has GFCI outlets and it trips when connected through the transfer switch, you are not alone.
Generator Transfer Switch vs a UPS: When You Need Both
A transfer switch handles the minutes and hours after an outage starts. But what about the first 30 seconds — before you walk to the garage, start the generator, and flip the switch?
That is where a UPS comes in. A UPS bridges the gap. Your router, modem, and desktop computer stay powered through the UPS battery while you get the generator running. Once the transfer switch is on generator power, the UPS stops discharging and recharges.
For critical electronics during outages: transfer switch + UPS is the right combination. The transfer switch covers the long outage; the UPS covers the transition. Two layers, zero downtime.
The Bottom Line
For most homeowners with a portable generator, an interlock kit is the better value — it costs half as much as a transfer switch, gives you access to every circuit, and looks cleaner with only one panel on the wall. The catch: your panel must be compatible, and your local inspector must allow it.
When the interlock kit is not an option — incompatible panel, local code says no, or you want the simplicity of only worrying about a few labeled circuits — a manual transfer switch is the correct answer. Either way, the generator inlet box goes outside, the generator stays 20 feet from the house, and the exhaust faces away from any door or window.
The worst transfer switch installation is better than no transfer switch at all. The people who backfeed dryer outlets think they are saving money. They are gambling with someone else’s life.
Frequently Asked Questions
What is a generator transfer switch and why do I need one?
A transfer switch is a device that safely connects a portable or standby generator to your home's electrical panel while completely isolating it from the utility grid. Without one, generator power can backfeed onto utility lines — which is illegal, can kill line workers, and will destroy your generator when grid power returns. A transfer switch is not optional; it is required by the National Electrical Code (NEC 702.5).
Transfer switch vs interlock kit: which is better?
An interlock kit ($50-150) is a metal sliding plate that physically prevents the main breaker and generator breaker from being ON at the same time. A transfer switch ($300-800 for manual) is a separate sub-panel with its own set of breakers. Interlocks are cheaper and give you access to every circuit in the panel, but not all panels support them and some jurisdictions prohibit them. Transfer switches let you select specific circuits but cost more. Both meet code when installed correctly.
How much does a generator transfer switch cost installed?
Manual transfer switch: $300-800 for the unit + $400-800 for electrician labor = $700-1,600 total. Automatic transfer switch (ATS): $500-2,000 for the unit + $800-1,500 labor = $1,300-3,500 total. The labor varies significantly by how far the generator inlet box is from the panel — longer conduit runs add cost. If you also need a [whole-house surge protector installed](/posts/whole-house-surge-protector-installation/), ask the electrician to do both in one visit to save on labor.
Can I install a transfer switch myself?
Yes, if you are experienced with electrical panel work and your jurisdiction allows homeowner electrical permits. The process involves mounting the transfer switch, running conduit to a generator inlet box, wiring the circuits you want powered, and connecting to the main panel. If any of this sounds unfamiliar, hire an electrician. The biggest risk (besides electrocution) is backfeeding the grid — which is deadly to utility workers and a criminal offense in many states.
What size generator do I need with a transfer switch?
A transfer switch does not care about generator size — it is rated by amperage (30A, 50A, or 100A are common for residential). Match the transfer switch amperage to your generator's outlet: a 5,000-7,500W generator typically has a 30A outlet, while 10,000-15,000W models use 50A. For [how long a UPS lasts](/posts/how-long-does-ups-last/) to bridge the gap between outage and generator startup, count on 5-15 minutes.