How to Test an Outlet: The 5-Minute Check (and the 5 Faults a Tester Can't See) (2026)
A plug-in outlet tester costs about twenty dollars and answers one question in three seconds: is this receptacle wired the way it should be? That is a real answer, and it is also where most people stop. The green light gets treated like a certificate of health, when it is closer to a smoke alarm that only detects one kind of smoke.
I have spent more than seven years maintaining critical-infrastructure power systems, where a receptacle is not “working” because a lamp turns on. It is working when the voltage is in range, the ground path is real, and nothing gets warm under load. Houses run the same physics at smaller scale. The difference between a tester and a test is knowing what each one can see.
This is the sequence I run in my own house: three tools, five minutes, and a clear list of what the results do and do not prove.
The Three Tools, and What Each One Can Actually See
You do not need a van full of instruments. You need three things, and the important part is the column on the right - the blind spots.
| Tool | Typical price (2026, US) | What it proves | What it cannot see |
|---|---|---|---|
| Three-light plug-in tester | $10-25 | Open ground, open neutral, open hot, reversed polarity | Loose connections, bootleg grounds, high-resistance grounds, anything that only fails under load |
| True-RMS digital multimeter (CAT III) | $35-70 | Actual voltage hot-neutral, hot-ground, neutral-ground; resistance with power off | Wiring errors that read correctly at no load; intermittent faults |
| Non-contact voltage tester | $15-30 | Whether a conductor or device is live before you touch it | Anything quantitative - it is a safety check, not a measurement |
The plug-in circuit tester is the fast screen. The digital multimeter is the actual diagnosis. The non-contact voltage tester is what keeps you alive while you work - never trust a breaker label, including your own, without checking the wire is dead at the box.
One warning that belongs up front: a cheap meter and a cheap set of probes are fine for 120-volt receptacles and not fine for a panel. If you plan to open the panel, buy CAT III rated equipment and know that the service lugs stay live with the main breaker off. Everything in this guide happens outside the panel, which is the part a careful homeowner can do.
The 5-Minute Sequence, In Order
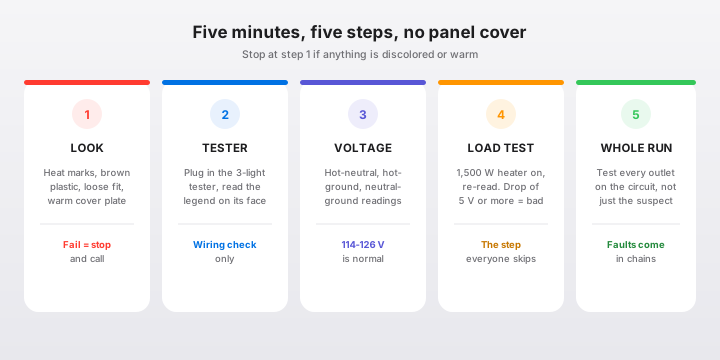
1. Look before you test (1 minute). A discolored face, a scorched slot, a cover plate that is warm, a receptacle that wiggles in the wall, or a plug that falls out under its own weight - any of these ends the testing and starts the repair. Heat marks mean the connection has already been arcing. Plastic that has gone brown is not cosmetic.
2. Plug in the tester (30 seconds). Read the legend printed on its face, not a chart from the internet - patterns differ between brands. Write down which lights came on. If nothing lights up, go to the dead-outlet sequence below before you conclude the tester is broken.
3. Measure the three voltages (2 minutes). Tester out, meter in. Details and expected numbers in the next section.
4. Load test it (1 minute). Plug in something honest - a 1,500-watt heater or a hair dryer on high - and re-read the voltage at that same receptacle. This is the step almost everyone skips, and it is the one that finds the faults a tester cannot.
5. Check every outlet on the circuit (1 minute). Faults are rarely lonely. A reversed polarity at one receptacle usually means someone rewired a daisy chain in a hurry, and the rest of the chain has the same problem. One pass with the tester down the whole circuit takes a minute and tells you whether you are fixing one outlet or a room.
Five minutes, no panel cover removed, no guessing.
The Multimeter Numbers That Matter
Set the meter to AC volts and read three combinations. The relationships between them are what make this diagnostic rather than decorative.
| Measurement | Black probe | Red probe | Normal | What an abnormal reading means |
|---|---|---|---|---|
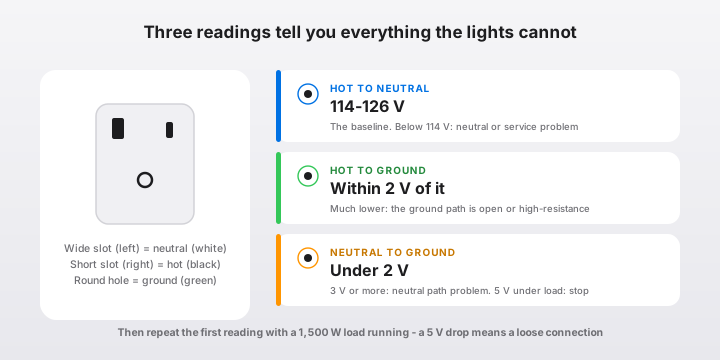
| Hot to neutral | Wide slot (neutral) | Short slot (hot) | 114-126 V | Under 114 V: neutral problem or a loaded-down service. Over 126 V: call the utility |
| Hot to ground | Round hole (ground) | Short slot (hot) | Within ~2 V of the reading above | Much lower: high-resistance or open ground |
| Neutral to ground | Round hole | Wide slot | Under 2 V | Over 3 V at no load: neutral path problem. Over 5 V under load: stop using the circuit |
| Loaded hot to neutral | Wide slot | Short slot | Drops 1-4 V with a 12 A load | Drops 5 V or more: resistance upstream, usually a loose termination |
The 114-126 volt window comes from ANSI C84.1 Range A for 120-volt service, and it is the range appliances are designed around. A reading of 122 volts in a house near the transformer is normal. A reading of 108 volts is not a “close enough” - it means something upstream is eating voltage, and the appliance pays for it in heat. Motors run hotter on low voltage, and electronics with switching supplies run harder. The same logic drives the voltage-drop checks in the flicker guide: the number is only interesting when you know what it should be.
The load test is the one that earns its keep. A backstabbed connection with two strands of copper left in it will read a flawless 121 volts with a meter on it, because the meter draws microamps. Put 12.5 amps through it and the same connection drops 8 volts, warms up, and eventually stops being a connection. If you want one habit from this article, make it this: measure with a load on, not just with the outlet empty.
Reading the Three Lights
Testers disagree on which lamp means what, so the legend on your device wins. The set of faults they report is standard:
| Legend reads | What it actually means | What to do |
|---|---|---|
| Correct / OK | Hot, neutral, and ground all present and on the right terminals | Still do the load test - this is a wiring check, not a connection check |
| Open ground | The round hole has no path back to the panel | Do not use three-prong appliances with metal cases on it. Repair the ground path |
| Open neutral | The wide slot is not connected, or is broken upstream | The outlet may still light a lamp dimly or not at all; loads will behave erratically. Kill the circuit and find the break |
| Open hot | No power at the hot slot | Not a wiring error yet - this is the dead-outlet hunt below |
| Hot/neutral reversed | Black wire on the silver terminal | Fix it. Bulb shells on that circuit are now live |
| Hot/ground reversed | Hot conductor on the ground terminal, or a neutral/ground swap upstream | Treat as a miswire and kill the circuit. This is not a “use it carefully” condition |
The “correct” reading deserves the most suspicion, because it is the one people act on. All a three-light tester knows is that voltage appeared where voltage was expected. It has no opinion about whether the path can carry current, whether the ground is real, or whether the connection will survive a space heater.
The Five Faults a Tester Cannot See
This is where the twenty-dollar tool runs out and the diagnosis starts. Every one of these passes a plug-in tester with a green light.
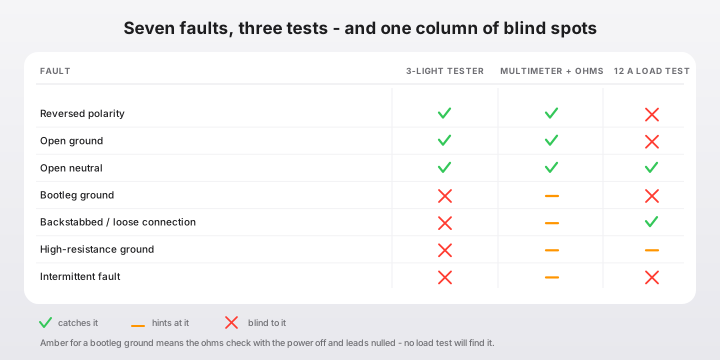
1. The bootleg ground. Someone jumpered the neutral terminal to the ground terminal at the receptacle, so a two-wire circuit reads “correct” on every tester made. It is common in older homes that were “upgraded” cheaply, and it is worse than an open ground, not better: the ground pin now carries neutral current, every appliance chassis on that circuit sits at a small voltage, and if the neutral opens upstream, the “ground” becomes a full 120 volts through whatever is plugged in. Electricians find these with the power off by measuring resistance from neutral to ground at the receptacle with the leads nulled - a real ground path back to the panel reads a few tenths of an ohm, while a jumper at the device reads essentially zero. Homeowners find them by looking: two wires under one screw on the neutral side, or a short jumper wire between the silver and green screws. If you see it, it needs an electrician, not a bigger tester.
2. The backstabbed connection. Push-in terminations on the back of a receptacle are a well-known failure point - the contact area is small, the spring relaxes with heat cycles, and the connection degrades quietly. I replace them with screw terminals or pigtails any time I have a box open. Nothing on a tester’s face reports this. A load test does, and so does a warm cover plate.
3. The high-resistance ground. A ground path can be present, continuous, and still useless - a corroded clamp, a loose splice, a ground wire landing on a painted box. The tester sees voltage to ground and calls it correct. The meter sees hot-to-ground lower than hot-to-neutral and hints at it. The real test is resistance with the power off, which is electrician territory.
4. The shared-neutral mistake. Two circuits sharing a neutral in a multiwire branch circuit will read perfectly at the receptacle and misbehave in ways nobody expects - a tripped breaker that leaves half the room live, AFCI trips that appear and vanish. If you have two breakers that both kill the same outlet, stop and get it looked at. The breaker triage guide walks through the timing patterns that separate these from ordinary overloads.
5. The intermittent fault. A connection that fails only when the house is warm, or only when the dryer runs, tests clean every time you test it. Log it for a week - time, weather, what was running - and the pattern usually names the culprit. Intermittent faults are found by pattern, not by luck.
There is a sixth category worth its own sentence: aluminum branch wiring, common in homes built roughly 1965-1973. It tests fine and fails at the terminations, which is why the failure often shows up as a warm plate or a scorched device rather than a reading. If you do not know what your branch wiring is, identify it before you start poking.
Testing GFCI and AFCI Properly
Both devices have a TEST button, and that button is the only test that counts.
A GFCI trips at 4-6 milliamps of imbalance - the range where a person is in trouble but not yet dead - and it does so in a fraction of a second. A plug-in GFCI tester simulates that leakage through the ground pin, which is why it cannot test a GFCI on an ungrounded circuit: there is no ground path to leak through, the device does not trip, and a perfectly good GFCI gets replaced. Press the TEST button on the device instead. Power should die, the RESET button should pop out, and RESET should restore it. Do that monthly, and replace any GFCI that fails - these are electronic devices with a service life, and ten years is a reasonable planning number, shorter in a humid garage or a kitchen that sees steam.
An AFCI breaker watches the current waveform for the signature of arcing. Its TEST button injects a simulated arc, and that is the definitive check; plug-in AFCI testers are indicators, not proof. If an AFCI trips repeatedly, the isolation drill in the GFCI vs AFCI comparison separates a real arc from the nuisance category - brushed motors, older vacuums, treadmills - and there is exactly one thing you must never do about it, which is replace it with a standard breaker.
The two devices protect against different hazards, and neither test tells you anything about the other. A receptacle can pass a GFCI test and still have reversed polarity. Which is the argument for running the whole sequence rather than one favorite check.
Dead Outlet: The Order to Check Things
An outlet with a tester that lights nothing is not automatically a wiring failure. In order:
- The other half. Many receptacles are half-switched - one socket always live, one controlled by a wall switch. Try both, and try the switch by the door you have never used.
- An upstream GFCI. Kitchen, bathroom, garage, basement, and exterior receptacles are often fed from one GFCI, sometimes in a different room. Find it and look at the reset button.
- The breaker. Look for one that is tripped rather than off - the handle sits between positions. Reset it once, and if it trips again, stop. That is a fault, not a fluke.
- The device itself. Test with a lamp you know works. A worn receptacle that no longer grips the blades can read fine and pass no current worth having.
- The wiring. If the breaker is on, the lamp is good, and the tester reads nothing, the break is in the wiring - a failed backstab, a broken splice in a box upstream, or a burned neutral. That is a licensed diagnosis, and it is also the point where the panel labeling work pays for itself, because you need to know what else is on the circuit before you kill it.
Fix, Replace, or Call
Illustrative 2026 U.S. figures. Parts are cheap; labor is the line item, and prices vary by region and access.
| Job | DIY parts | Installed by an electrician |
|---|---|---|
| Standard 15 A receptacle | $3-8 | $150-300 |
| Spec-grade or tamper-resistant receptacle | $8-15 | $150-300 |
| GFCI receptacle | $18-30 | $180-350 |
| Weather-resistant GFCI (outdoor) | $22-40 | $200-400 |
| Diagnostic service call | - | $75-150, often credited toward the repair |
| New circuit for a chronically overloaded room | - | $400-1,200 |
A straight swap of a receptacle on a circuit you have verified dead is a reasonable homeowner job: kill the breaker, verify with a non-contact tester, photograph the wiring before you disconnect it, and land the wires on the screws - brass for hot, silver for neutral, green for ground. Everything else belongs to someone with insurance: new circuits, anything aluminum, anything with heat damage, anything where the box contains more wire than you can identify.
If you are replacing a device anyway, spend the extra few dollars on a spec-grade tamper-resistant receptacle instead of the cheapest one on the shelf. The difference is the spring tension that decides whether the plug stays tight for fifteen years or two, and loose contacts are how outlets start fires. For wet locations, a weather-resistant GFCI and an in-use cover are the minimum.
The Fall Drill: Twenty Minutes, Once a Year
Pick a weekend in October, before the heaters come out.
- Test every GFCI and AFCI in the house with its own button (5 minutes)
- Run the plug-in tester around the receptacles you actually use, prioritizing kitchen, bathrooms, garage, laundry, and anything outdoors (8 minutes)
- Load test the two or three outlets that carry heaters, window ACs, or power tools (4 minutes)
- Put your hand near - not on - the cover plates of any outlet running a continuous load, and look for discoloration (3 minutes)
That is the whole maintenance program, and it catches the failures that matter before they become the kind that smell like burning. It is also how you find the extension cord that has been a permanent fixture since last winter, which is its own category of hazard.
When to Stop Testing and Call
Stop, kill the circuit, and make the call if any of these are true:
- Any discoloration, scorch mark, or burning smell at a device or cover plate
- A cover plate that is hot to the touch
- A buzzing or crackling sound at a receptacle, switch, or panel
- A shock from an appliance, a fixture, or the receptacle itself - however mild
- A breaker that trips again immediately after one reset
- A tester reading that changes when you wiggle the plug
- Aluminum branch wiring you have not had evaluated
- Anything that requires removing the panel cover
Everything else in this guide is diagnostic work you can do with a meter and a Saturday morning. The line is not about difficulty - it is about what happens if you are wrong.
The Bottom Line
A tester tells you whether the wires are on the right terminals. It does not tell you whether the connection can carry current, whether the ground is real, or whether the outlet will still be safe in five years. Those three questions need a meter, a load, and your eyes - in that order.
Five minutes per outlet, once a year, is enough to catch almost everything that is catchable. The rest is knowing the difference between a green light and a green light you can trust.
Frequently Asked Questions
How do I test an outlet with a multimeter?
Set the meter to AC volts (200 V or auto range), insert the black probe in the neutral slot (the wider one) and the red probe in the short hot slot, and read: 114 to 126 volts is normal in the U.S. Then move the black probe to the round ground hole and read hot-to-ground - it should match the first reading within about 2 volts. Finally read neutral-to-ground, which should be under 2 volts. Three readings in under a minute. The caution that matters: use a CAT III rated meter and undamaged probes, and keep your fingers behind the finger guards. A no-load voltage reading proves the wiring is connected, not that the connection is good - for that you need a load test.
Why does my outlet tester say correct when the outlet does not work?
Because a three-light tester draws microamps. It can light up correctly through a connection with a single strand of copper left, and it cannot see resistance that only shows up under 12 amps. The dead-outlet sequence is: check whether the outlet is half-switched (look for a wall switch that controls it), check for a tripped GFCI upstream - often in another room or the garage - then check the breaker, then test the receptacle with a known load like a lamp. If a lamp works and your device does not, the outlet is fine and the device is not. If nothing works but the tester lights up, you are looking at an open neutral or a failed device, and a load test will confirm it.
Can I test a GFCI outlet with a plug-in tester?
Yes - but only on a circuit with a working ground, because a plug-in GFCI tester trips the device by leaking a few milliamps from hot to ground. On a two-wire circuit with no ground, a perfectly healthy GFCI will refuse to trip for the tester, and people replace good devices because of it. The authoritative test is the TEST button on the GFCI itself: it creates a real imbalance internally and does not depend on your ground path. Press TEST monthly, confirm the reset button pops out and power dies, then press RESET. If the device will not trip or will not reset, replace it - a GFCI that fails its own test has failed its job.
What does open ground mean and how dangerous is it?
Open ground means the round hole is not connected back to the panel, so a fault inside an appliance has no low-resistance path to trip the breaker. The appliance keeps working normally - right up until a hot wire touches the metal case, and then the case sits at 120 volts waiting for someone to touch it. It also quietly disables much of what you paid for: surge protectors and most UPS units shunt to ground, and a GFCI tester cannot trip without one. The code-compliant repair for a non-grounding circuit is either running a proper equipment ground or protecting the circuit with a GFCI and marking the receptacles 'GFCI Protected' and 'No Equipment Ground' - never a bootleg jumper from neutral to ground.
What does it mean if my tester says hot and neutral are reversed?
The black hot wire is landing on the silver neutral terminal instead of the brass one - usually a careless replacement, occasionally original work from a previous owner. It is not instantly fatal, which is exactly why it survives for decades: lamps and phone chargers do not care. But the shell of every screw-in bulb socket on that circuit is now hot instead of neutral, which turns a routine bulb change into a shock risk, and the wider neutral blade that appliances rely on is live. It takes ten minutes to fix at the receptacle. Kill the breaker, verify dead with a non-contact tester, and move the wires to the brass and silver screws - or have it done.