New Construction Electrical Inspection: What to Check Before You Close (2026 Electrician's Checklist)
Most people assume a new house comes with a trustworthy electrical system. It came from a licensed electrician, it passed inspection, the builder warranties it - what is there to check? Plenty, says the person who checks power systems for a living.
I have spent more than seven years maintaining critical-infrastructure power, where an unnoticed loose connection is measured in megawatts, and that job builds one habit: verify. Not because people are careless - because “passed inspection” is a much narrower statement than buyers think. It means the installation met the minimum requirements of the adopted code at two checkpoints, rough-in and final, as seen by a municipal inspector working through an entire development. It does not mean every receptacle was tested, that every breaker label on the panel is true, or that anything beyond the code minimum made it into your walls.
The good news is that a new build hands you the best inspection windows you will ever get on any house. The wiring is visible once before the drywall closes, the system is empty and energized once before you move in, and the builder is responsible for defects for a year after that. Miss all three and the next window is the one where you pay an electrician to open a wall.
Here is the drill for each.
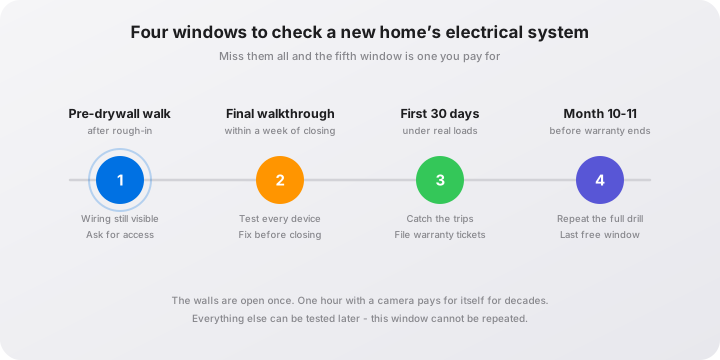
The Short Answer: Four Windows
| Window | When | What it catches |
|---|---|---|
| Pre-drywall walkthrough | after rough-in inspection, before insulation and drywall | wire routing, box placement, nail plates, panel setup, anything you want to add cheaply |
| Final walkthrough | usually within a week of closing | GFCI and AFCI function, every outlet, the panel legend, coverage versus your plan |
| First 30 days | move-in month, under real loads | nuisance trips, outlets that fail under load, GFCI behavior with real appliances |
| Month 10-11 | one month before the first-year warranty ends | everything that quietly degraded in year one |
Miss all four and the fifth window is a repair bill. The single most valuable hour in the list is the first one, and it is the one most buyers do not know to ask for. Start there.
Why a New House Still Has Electrical Problems
Three kinds of defects survive new construction, and none of them require a careless builder.
Items that only fail under load. An outlet can look fine and still fail the first time a space heater pulls 12 amps through it. Loose terminations behave exactly this way - perfect at no load, warm and intermittent under real current - which is why problems surface in January, not at the walkthrough.
Items behind something. The electrical work gets covered by insulation and drywall, and then the finishing trades arrive. A drywall screw through a cable or a strap pulled off a stud damages the wiring invisibly. Weeks later it shows up as a dead circuit or a tripping AFCI.
Items that depend on somebody finishing someone else’s work. Panel labeling, outdoor covers, the last receptacle plates - small finishing items are where busy schedules leak, and no municipal inspection hunts them down.
And one structural point worth internalizing: code is a floor, not a ceiling. The code that governs your house requires an outdoor receptacle on the front and the back - it does not know you grill on the side. It requires a receptacle near the bathroom basin - it does not know you wanted one by the toilet for a bidet seat. Code defines what must be there. It says nothing about what you will wish were there. The gap between those two is what a new-construction checklist is for.
Stage 1: The Pre-Drywall Walkthrough (Ask for It)
After the rough-in inspection passes and before insulation goes in, your house is still a skeleton. Every cable run is visible, every box is open, and the panel is mounted with nothing in front of it. One hour in this window is worth a year of guessing later, and it costs nothing - but it does not happen automatically. You ask your builder’s construction manager for a pre-drywall walkthrough. Most production builders allow it, some as a standard appointment and others on request. A few only allow it if a private inspector accompanies you, which is an even better version.
Bring a phone with free storage, a notepad, and about an hour. Photograph everything.
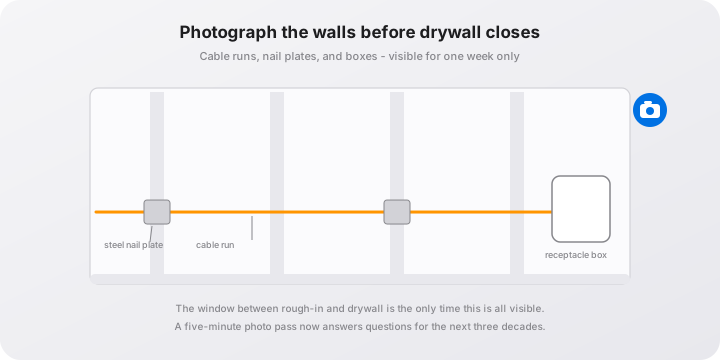
Here is what deserves your attention while the walls are open:
| What to look at | Why it matters |
|---|---|
| The panel | Read the size on the main breaker - 200A is the modern standard for a house. Note the brand and how many breaker spaces are free; spare capacity is future capacity. |
| Panel location and clearance | It needs clear working space in front (roughly 3 feet deep and 2.5 feet wide) and should not sit inside a closet or a bathroom. If it does, that is a relocation conversation - much cheaper now than later. |
| The grounding | Follow the grounding electrode conductor to the rod or foundation steel and photograph the connection. It is the most important wire in the house and it will never be visible again. |
| Cable routing photos | Every room, two angles. These photos become your map of what is inside the walls - for hanging a TV, for remodels, for locating a fault years from now. |
| Nail plates | Where a cable passes within about 1-1/4 inches of a stud face, the code wants a steel plate so a future screw or nail cannot reach it. Check the crossings you can see; adding plates now is trivial, adding them later is impossible without opening the wall. |
| Boxes and their purposes | Walk room by room: which box is a switch, which is a receptacle, which serves a fixture. Compare against the plan and against the three places you will actually plug things in - nightstand, TV wall, kitchen counter. |
| Dedicated circuits | Ask for the list of what is dedicated: the two kitchen circuits, laundry, bathroom, disposal, dishwasher, refrigerator, furnace. Confirm it matches what you expect to plug in where. |
| Bath fans | Confirm each exhaust fan terminates outside the house - not in the attic, not under insulation. Photograph the duct run; it is another thing you will never see again. |
| Switch boxes | If smart switches are in your future, ask now for neutrals in switch boxes. Some models need one, and retrofitting means fishing cable. Background is in our smart home electrical planning guide. |
| Conduit to the future | If you might add an EV charger, a garage workshop circuit, a shed feed, or a hot tub, ask about conduit now. A conduit run costs almost nothing while walls are open; fishing a circuit later means opening walls. |
While you have the builder’s ear, this is also the moment to make the changes that are only cheap once.
What to Add While the Walls Are Open
Every item below costs a fraction of its later price before drywall closes:
- A circuit or conduit for EV charging. Even if the EV is years away, the conduit is the expensive part to add later. Load checks and panel capacity belong in the same conversation - our EV charger installation cost guide covers what drives the numbers.
- A whole-house surge protector. It installs at the panel, so having it done while the electrician is already working on bare walls is the cheapest version of the job. The device itself is a modest line item; typical installed cost runs $250-700 depending on the panel, and the installation walkthrough explains what is involved.
- Extra receptacles where you will actually want them. Garage workbench, patio, hallway, the corner where the Christmas tree goes. Every outlet added now is roughly a hundred dollars of work; after closing, the same outlet costs several times that.
- A transfer switch or interlock for a future generator. If standby power is a someday plan, the connection point is best built now. The generator transfer switch guide covers the options and how they differ.
- Neutrals in every switch box. Cheap insurance for the smart switches you have not bought yet.
Ask for all of it as a written change order with prices, before the drywall stage. Builders handle these requests every day. What is common is buyers remembering too late.
Stage 2: The Final Walkthrough Drill
By walkthrough day the drywall is closed, the power is on, and you have one supervised visit to find what needs fixing before money changes hands. Ten minutes of that visit spent on the electrical drill is the difference between the builder fixing something and you living with it.
The whole drill runs on a small kit: a receptacle tester (about $15-30), a non-contact voltage tester ($20-40), your phone camera, and - for mapping the panel labels once you move in - a breaker finder ($30-60). Add a roll of painter’s tape to flag what failed, so you can point at it instead of describing it.
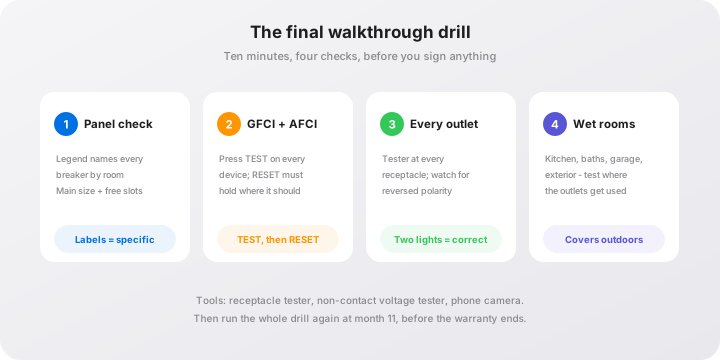
- Panel first. Open the door - no tools needed, and do not remove the inner cover. Read every label. A label that says LIGHTS for three different breakers is technically legal and practically useless; ask for specific labels before closing. Note the main breaker size and whether anything is already tripped.
- GFCI devices. Find one in every wet location: bathrooms, kitchen counter, laundry, garage, outside. Press TEST - power should cut instantly. Press RESET - it should hold. A device that will not reset has failed its own self-test. How they work, and why a tripping device is never the enemy, is covered in our GFCI vs AFCI guide.
- AFCI breakers. Bedroom and living-area breakers carry a small test button. Press each one: the breaker should trip, then reset. Then plug your tester into an outlet on each AFCI circuit to confirm the circuit actually serves where its label says it does.
- Every receptacle. Plug the tester into every outlet you can reach and compare the reading against the legend printed on the tester. Correct wiring shows the standard two-light pattern; reversed polarity and open ground each produce their own signature. Nothing else in daily life will ever catch a reversed outlet for you.
- Switches and fixtures. Turn every switch on and off, including three-way pairs at both ends. Note any dimmer that flickers or buzzes - LED dimmer compatibility is a common easy fix. Plug a phone charger into any USB-equipped outlet.
- Kitchen, bath, and exterior specifics. At the kitchen counter, confirm outlets where you would actually use appliances. Every outdoor receptacle needs a weatherproof in-use cover - the bubble type - and should have a working TEST button. Confirm outdoor outlets exist on both the front and the back of the house.
- Smoke and CO alarms. Press each test button. In an interconnected system, testing one unit sounds all of them. Confirm at least one alarm near each sleeping area.
- Write everything down. Photos, tape flags, a written list. A defect that appears on the punch list gets fixed as a line item. A defect mentioned verbally to a busy superintendent is a coin flip.
The Code Baseline: What a New Home Should Already Have
You do not need to memorize code to inspect a house, but knowing the baseline turns “I think that is wrong” into “that is not what is required.” As adopted across most of the US:
| Location | GFCI | AFCI | Also expected |
|---|---|---|---|
| Bathrooms | Required | - | 20A circuit; receptacle within 3 ft of each basin |
| Kitchen countertops | Required | Required (2014+) | Two or more 20A circuits; no point on the counter more than 24 in from an outlet |
| Laundry | Required | Required (2014+) | Dedicated 20A circuit |
| Garage and outdoors | Required | - | Weather-resistant devices; one receptacle per car bay; front and back outdoor outlets |
| Bedrooms | - | Required (1999+) | Tamper-resistant receptacles |
| Living areas and hallways | - | Required (2008+) | A hallway 10 ft or longer needs an outlet |
| Unfinished basement | Required | - | At least one receptacle |
Two notes on the table. First, which code edition your state has adopted varies - your building department is the authority, and this is the widely common baseline, not a substitute for checking. Second, tamper-resistant receptacles - the ones with shutters that stop a key or a fork - have been required in new homes since 2008. Test one with a house key: it should refuse the blade. That little maneuver just verified a whole-house feature nobody thought to mention.
The Defect List: What Actually Shows Up
Over enough new builds, the failures rhyme. This is the short list I would put money on:
| What | How it shows up | Best fix window |
|---|---|---|
| A panel legend that maps nothing | breaker labels are guesswork; LIGHTS kills the fridge | walkthrough - have it corrected before closing |
| Missing GFCI at one location | no test buttons in a wet room - often the garage or laundry | walkthrough |
| AFCI nuisance tripping | the vacuum takes out the bedroom circuit | first 30 days; isolate per the GFCI vs AFCI drill - never swap in a standard breaker |
| A loose termination | flicker, a warm cover plate, an outlet that quits under load | year one, under warranty |
| Drywall-phase cable damage | one circuit dead or tripping after move-in | year one; your pre-drywall photos help locate the run |
| Reversed polarity outlet | only a tester sees it | walkthrough |
| Missing in-use cover outside | the GFCI trips after every rainstorm | year one |
None of these are exotic. All of them are free to fix in the right window and annoying to fix in the wrong one.
Punch List, Warranty, and the 11-Month Visit
Three habits get everything on this list handled at no charge.
Write it down, every time. The punch list before closing is a document, and so is a warranty request. Include the room, the device, and a photo. Verbal requests do not survive contact with a busy construction schedule.
Know which side of closing you are on. Before closing, the builder has maximum incentive to clear the list - the money has not moved yet. After closing, you are in warranty-request territory, where the same repair is queued rather than rushed. Neither is bad. Knowing which side you are on tells you how hard to push.
Run the drill again at month 11. The first-year workmanship warranty - typically one year, with terms that vary by builder and state - is one of the few genuinely free repair windows you will ever get on this house. One month before it ends, walk the house with your tester and checklist one more time. Every dead outlet, every stubborn GFCI, every breaker that never quite behaved: in writing, with photos. The defects that appear in months 9 through 12 are exactly what the warranty exists for, and most homeowners never use it.
One safety note that outranks the schedule: if anything smells like burning, the panel cover is warm, or a device ever shocks you, stop the walkthrough and call the builder’s electrical contractor or your utility immediately. Some things should never wait for a punch list.
The Bottom Line
A new house does not come with a guarantee that someone verified everything. It comes with a code-minimum installation, a builder who answers for it for a year, and three good windows to check its work. The pre-drywall hour, the walkthrough drill, and the month-11 visit cost about three hours total and less than a single electrician service call in tools. In exchange, the small stuff that would have become your problem in year two becomes the builder’s problem in year one - and you get to see the walls keep their secrets before they close.
Four windows. One tester. Go close well.
Frequently Asked Questions
Do I still need a home inspection on a new construction house?
Yes, and especially on a new build. The municipal inspections that happen during construction check that the work meets code minimums at two or three visits. They are not a functional test of the house and they do not look at anything from your perspective as a buyer. A private inspector - illustrative cost of a few hundred dollars for a full new-construction inspection, with an electrical add-on often $100-250 - visits at the pre-drywall stage and again before closing, and finds the small things that would otherwise become your problem in year one: reversed outlets, missing GFCI protection, mislabeled breakers, a bath fan vented wrong. Ask your builder for access; most allow it at defined windows. On the most expensive purchase of your life, the inspection is the cheapest line item, and it is the one most buyers skip because the house is new.
What should I check at my new home final walkthrough?
Run the electrical drill before you look at paint touch-ups. Open the panel door and read the legend - every breaker should name a specific room or load, not just LIGHTS. Press TEST and RESET on every GFCI and AFCI device. Plug a receptacle tester into every outlet you can reach, hunting reversed polarity and open grounds. Operate every switch, including three-way pairs. Test the outlets where they will actually be used - kitchen counter, bathroom, garage, outside. Check that outdoor outlets have weatherproof in-use covers. Photograph anything that fails and put it on the punch list in writing, not a verbal mention. Then run the same drill again at month 11, before the first-year warranty expires.
Why is the AFCI breaker in my new home tripping?
Two families of causes. Nuisance trips: brushed motors - a vacuum, treadmill, or older power tool - produce waveform noise that arc detection can mistake for arcing, and some of these trips are the device working as designed on a load it dislikes. Real problems: a loose termination, a shared neutral on a multiwire circuit, or a cable damaged during construction. Run the isolation drill: unplug everything on the circuit and reset. If it holds, add devices back one at a time. If it trips with nothing plugged in, that is a wiring problem - call the builder's electrician while it is still under warranty. What you must never do is let anyone solve it by installing a standard breaker. That is not a fix; it removes the protection the code requires.
How long is the builder's warranty on electrical work?
Most production builders offer a one-year workmanship warranty, with longer coverage on some systems that varies by builder and state. Electrical defects that appear in year one - a dead outlet, a nuisance-tripping breaker, a GFCI that will not reset - should be repaired at no charge. The professional move is an eleven-month walkthrough: one month before the warranty expires, run the full drill again and submit everything in writing through the warranty portal, with photos. Verbal conversations with a site supervisor are worth exactly as much as you can prove later, which is nothing. Also keep the records after the warranty ends - your photo set and repair list are the most useful documents the house will ever have.
Is it worth upgrading the electrical during construction?
Yes - the walls are open, which makes this the cheapest the work will ever be. The upgrades with the best payback: a conduit run, or a full circuit, for a future EV charger; a whole-house surge protector added at the panel while the electrician is already there (typical installed cost $250-700); extra receptacles where you will actually want them; and switch boxes wired with neutrals so smart switches are a drop-in later. Get every upgrade quoted in writing as a change order before the drywall stage closes. After closing, the identical work costs several times more, mostly because of access alone - someone has to open what you could have addressed for the price of an hour and a length of conduit.