Smart Home Electrical Planning: The Neutral Wire Check That Decides What You Can Install
A reader sent me a photo of an open switch box last month with a one-line message: where is the neutral wire?
That question decides more smart-home purchases than any review site will tell you. An in-wall smart switch is a small computer, and a computer needs its own power supply. A mechanical switch interrupts the hot wire and needs nothing else. A smart switch needs a continuous line and a neutral so its radio can stay awake while the lights are off. No neutral, and most smart switches are dead on arrival - not defective, just incompatible with the wall.
This is why smart-home planning is electrical planning first. The fun part of the hobby is routines, scenes, and dashboards. The part that decides what you can actually buy is what is inside your walls - and it is knowable, in an afternoon, with a screwdriver and a voltage tester. I do these checks for a living, and I have talked more people out of the wrong purchase than into one. Here are the five checks, in the order that saves the most money.
The Five Checks, in Order
| # | Check | Why it matters | What it costs you if skipped |
|---|---|---|---|
| 1 | Neutral wire in the switch box | Most smart switches need line + neutral to power their radio | Switch cannot be installed; return and restocking |
| 2 | Box depth and fill | Smart switches are far deeper than mechanical ones | Box will not close; wires pinched and stressed |
| 3 | Circuit load and device type | Smart plugs and dimmers have wattage and load-type limits | Overheating plug, flickering lights, damaged gear |
| 4 | Ground wire and circuit type | Most smart switches need a ground; three-way circuits need special models | Unit will not work, or will not work safely |
| 5 | Power-outage behavior | Hubs, routers, and Wi-Fi die - the smart house goes dumb | No app control, no cameras, no remote monitoring |
Work them in this order. Check 1 alone eliminates most of the bad purchases, and it costs ten minutes.
Check 1: Is There a Neutral Wire in the Box?
Three conductors matter at a modern switch box: the hot (black, or re-marked as such in some circuits it is red), the neutral (white), and the ground (bare copper or green). The hot carries voltage to the switch. The neutral carries current back to the panel. A mechanical switch only needs the hot - it just breaks the circuit. A smart switch needs hot and neutral, because it has to power its own electronics while the light is off.
How to check, safely, in about ten minutes:
- Turn the breaker off and confirm the circuit is dead with a voltage tester. Test the tester on a live circuit first, so you know it actually works - this is the step people skip, and it is the one that matters.
- Remove the switch plate and unscrew the switch from the box. Pull it forward gently; do not yank on wires.
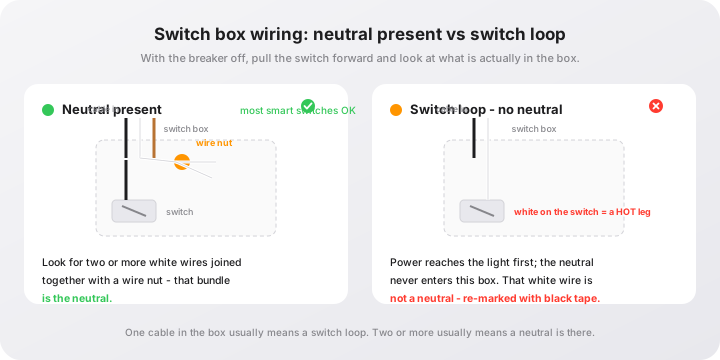
- Look for a bundle of two or more white wires joined together with a wire nut, separate from the switch. That bundle is your neutral. Two or more whites capped together is the confirmation you want.
- Do not mistake a single white wire attached to a switch terminal for a neutral. In switch-loop wiring, power travels to the light fixture first and a white wire drops down to the switch carrying the hot leg - which is why code says it should be re-marked with black tape. That white wire is a hot, and treating it as a neutral is how people create genuine hazards.
- Count the cables entering the box. One cable (two insulated conductors plus ground) usually means a switch loop with no neutral. Two or more cables usually means a neutral is present.
One good sign: the code cycle since 2011 has required a neutral at most new switch installations in living spaces, so houses built or rewired after that are usually fine. Houses from the switch-loop era are where the surprises live - and a neutral is almost always present at outlet boxes even when it is missing at the switch, which is a hint that the wiring exists, just not where you need it.
If you found the white bundle, most smart switches are on the table.
If There Is No Neutral: Four Ways Forward
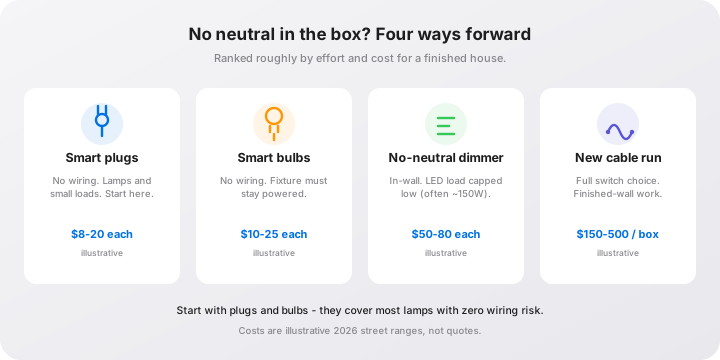
You have four real options, and they are not equal. This is how I rank them for a normal finished house.
| Option | How it works | Typical cost | Best for | Limits |
|---|---|---|---|---|
| Smart plugs | Turns any plug-in lamp or small appliance smart; no wiring | $8-20 each (illustrative) | Lamps, fans, holiday lights | Only plug-in devices; load limits apply |
| Smart bulbs | Wi-Fi or Zigbee bulb; no wiring at all | $10-25 each (illustrative) | Lamps you want scheduled or colored | Fixture must stay powered; useless with the switch off |
| No-neutral dimmer | Runs on a trickle of current through the load | $50-80 per switch (illustrative) | The one fixture you actually dim | LED load capped low - often around 150W; needs compatible dimmable bulbs |
| Run a new cable | An electrician fishes new cable to the switch box | $150-500 per box (illustrative) | When you want full switch choice | Cost; finished walls; permits vary by area |
The honest guidance: start with smart plugs and bulbs, because lamps are most of what people actually want to automate first, and neither requires touching a wire. A non-contact voltage tester and a set of smart plugs will get you ninety percent of the way with zero risk to your walls.
The no-neutral dimmer is the right answer when the light itself is the point - the kitchen table fixture you dim every single evening, the dining room chandelier. No-neutral dimmers exist precisely because this problem is so common; the well-known lines such as Lutron Caseta dimmers are built on the no-neutral trick, and they work well - with two caveats I always explain before the sale. First, they need dimmable, compatible bulbs; a standard non-dimmable LED will flicker or buzz, and that is the bulb’s fault, not the dimmer’s. Second, LED loads are capped low, often around 150W, so a chandelier with ten high-wattage bulbs can exceed what the dimmer wants to drive without a neutral. Check the load chart in the manual the way you would check a breaker rating.
Running new cable is a renovation decision, not a smart-home decision. Do it when walls are open, or when you are already paying for an electrician’s visit - the marginal cost of adding one cable run to a bigger job is far lower than booking a dedicated visit.
Check 2: Box Depth - The Cram Factor
Even when the neutral is there, the box can still say no.
A mechanical switch is a few millimeters of plastic and brass. A smart switch is a circuit board with a relay and a radio, and it is typically two to three times deeper. Two problems follow. The first is physical: with most smart switches you want roughly an inch and a half of clear depth behind the mounting straps, and shallow old boxes do not have it - the device ends up standing off the wall, or the wires fold into a space that is not there.
The second problem is box fill, which is where code actually has numbers. Conductor fill is counted in cubic inches: 14-gauge wire counts as 2.0 cubic inches per conductor, 12-gauge as 2.25, and every device counts as two conductors, with all grounds counting as one. A box’s volume is stamped on it. A standard 14/2 switch setup - two insulated conductors, one ground, one device - fits most old boxes with room to spare. Then a smart switch arrives with a pigtail bundle and an extra wire nut, and an old shallow box can go from comfortable to genuinely overstuffed. Overstuffed boxes are where insulation gets pinched, and pinched insulation is a slow failure you never see.
Cheapest fixes first:
- A box extender ring ($3-10, illustrative) adds about an inch and a half of depth at the front of the box. For a lot of older homes this is the entire fix, and it is a five-minute job. A standard box extender costs less than the return shipping on a switch that does not fit.
- Shorter conductors, tidy folds. Folding the wires accordion-style rather than stuffing them back in a bundle buys real space, for free.
- Replace the box. An old-work deeper box means removing the old one - messy but a normal hour of electrician time, and the permanent fix when the box is both shallow and crowded.
If the box is shallow, crowded, and the wires are brittle with age, that is where I tell people to stop and book it out. Some checks end in a purchase; some end in a phone call. Both are fine outcomes.
Check 3: Load Limits - Watts, Dimming, and the One Appliance to Never Plug In
Three separate limits hide in this one, and confusing them is how people cook their gear.
Smart plugs have a wattage ceiling, and a load-type ceiling. Most reputable models are rated 15A/1800W at 120V for resistive loads - a lamp, a string of lights, a charger. That is not an invitation to run a space heater through a $15 device. Circuit loading rules say a continuous load should stay under 80% of the breaker rating, which is 1,440W on a 15A circuit, and the smart plug with its relay is the weakest thermal link in that chain. My own rule is simpler: nothing over about 10 amps on a smart plug. No space heaters, no portable air conditioners, no hair dryers, no irons. Lamps, fans, holiday lights, phone chargers, and a coffee maker on a short morning schedule - all fine.
Dimmers are matched to their load, not to their price. Older dimmers were built for incandescent bulbs that behaved like resistors. LEDs are electronic, and they interact with dimmers in ways that show up as flicker, buzz, or a light that cuts out at the bottom of its range. Two symptoms you will meet: bulbs that flicker at low brightness (usually an incompatible or non-dimmable LED), and dimmers that flicker or misbehave below a minimum load (many dimmers want 10-25W of connected load, which a single modern LED bulb may not reach). Both have the same fix - compatible dimmable bulbs, enough of them, and the compatibility chart from the dimmer’s manual.
Motors are not lamps. A fan needs a fan-rated speed control, not a light dimmer; the electronics are different and using the wrong one is hard on both devices. I would also keep motors off smart plugs as a category: a cheap relay is an odd place to put the start-up surge of a compressor or a pump. The things people most want to plug in - lamps and lights - are exactly the loads smart plugs handle best. The things people least want to plug in are the ones they should not.
Check 4: Ground Wires, Two-Wire Houses, and Three-Way Circumstances
Two wiring questions decide the rest of the plan.
Ground. In homes built roughly before the 1960s, circuits often ran with two wires and no equipment ground. Most smart switches want a ground connection to be listed for use as installed; check the manual. When there is no ground path, the clean options are smart bulbs and smart plugs, which need no wiring at all and sidestep the question entirely. If the wiring era is unknown, the check is worth doing anyway - houses from that period have other stories to tell, which is why I wrote a separate guide on how to tell if your house has aluminum wiring.
Circuit type. Three-way circuits - two switches controlling one light - are the most common source of wrong purchases in this whole hobby. A smart replacement for a three-way usually means buying a matching model plus a companion switch, identifying which box has the line feed, and tracing wiring carefully. Add a GFCI-protected circuit (bathrooms, kitchens, and garages) and one more wrinkle appears: no-neutral devices that run on a trickle of current through the load can, in some installations, nuisance-trip a GFCI. If the switch you want to replace sits on a GFCI-protected circuit, verify compatibility before buying. None of this is a reason to avoid smart switches. It is a reason to identify the circuit before the product page.
Check 5: What Your Smart Home Does When the Power Goes Out
Here is the part that changes how you should think about backup power: a smart home is more dependent on the grid, not less. Every switch, plug, bulb, and hub is another device that dies with the mains. Your router and modem go down too, so even battery-powered cameras cannot reach the cloud.
What actually happens in a blackout, room by room:
| Device | During an outage | Notes |
|---|---|---|
| Smart switches (in-wall) | Physical switching keeps working; app control dies | The relay is still a relay; schedules and scenes need the hub |
| Smart plugs and bulbs | Dead with the mains | Battery-free; nothing to rescue |
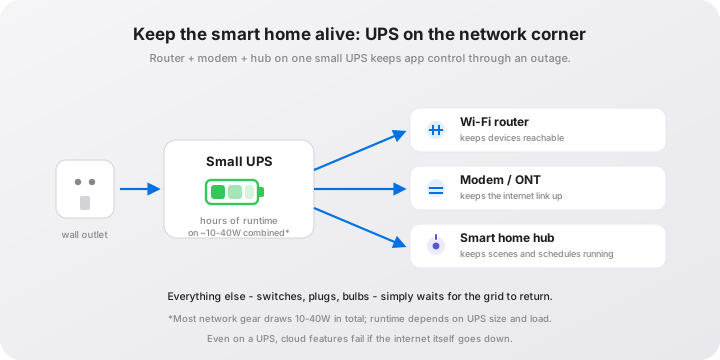
| Hub and router | Dead within minutes unless on a UPS | This is the single point that takes the whole house offline |
| Smart locks | Keypad codes still work; app unlock depends on hub | Codes live in the lock, not the cloud |
| Battery sensors and cameras | Keep reporting if their hub is powered | Battery cameras without a hub may lose cloud access |
The fix costs less than one smart switch. A small UPS keeps a router, modem, and hub running through short outages and multi-hour events, and those devices draw only about 10-40W combined (illustrative), so the runtime math is friendly - a modest unit is plenty. This is precisely the use case behind our UPS for router and modem guide, and if your hub is really a mini-PC or home server, the server rack power guide covers sizing it properly.
One design principle to carry through the whole plan: favor devices that work locally over cloud-only gear. Most in-wall smart switches still switch when the internet is out - the paddle works, because the relay does not need the cloud. Cloud-dependent products, by contrast, become bricks when either the internet or the account service hiccups. The full power outage preparation guide is worth a read before you build a house that needs Wi-Fi to turn on a light.
Room by Room: What I Would Check Before Buying
| Where | What you probably want | Check before you buy |
|---|---|---|
| Living room, bedrooms (lamps) | Smart plugs | Nothing more than plug wattage - start here |
| Kitchen, dining (ceiling fixture) | Smart dimmer or no-neutral dimmer | Neutral in box; dimmable LEDs; dimmer load chart |
| Hallways, stairs, exterior | Smart switch | Neutral; box depth; ground |
| Bathrooms | Smart bulbs or plugs | GFCI circuit - prefer non-wired options for now |
| Network corner (router, modem, hub) | Small UPS | Combined wattage of the three; runtime you want |
The Bottom Line
Smart home money is lost in the wrong order: gear first, walls second. Flip that order. Ten minutes with a screwdriver and a voltage tester - breaker off, tester confirmed on a live circuit - tells you which of the five checks your house passes, and the answers decide everything else. The houses that go smoothly are not the newest ones; they are the ones where someone looked in the box first.
If you take one thing from this guide, take this: the neutral wire check is the whole decision. Do it before the cart, not after the return label.
And if the check ends in a phone call instead of a purchase, that is not a failure. That is the system working.
Frequently Asked Questions
Do smart switches need a neutral wire?
Most in-wall smart switches and most smart dimmers do, yes. A mechanical switch only interrupts the hot wire, but a smart switch is a small computer with a radio that must stay powered even when the light is off, so it needs a continuous line and a neutral. The exceptions are no-neutral dimmers, which are designed to run on a trickle of current through the light fixture itself. Those exist, they work, and they come with real limits: LED loads are capped low (often around 150W), the bulbs must be dimmable and compatible, and a minimum load is usually required or the dimmer will flicker. If a product listing says neutral required, believe it - the box itself will not argue.
How do I check if my switch box has a neutral wire?
With the breaker off and the circuit confirmed dead using a voltage tester, unscrew the switch and look for a bundle of two or more white wires joined together with a wire nut, separate from the switch. That bundle is the neutral. The classic trap: a single white wire connected to a switch terminal is not a neutral. In older switch-loop wiring, power goes to the light first and a white wire drops down to the switch carrying the hot leg, which is why it should be re-marked with black tape. Seeing one cable entering the box points to a switch loop with no neutral; seeing two or more cables usually means the neutral is there. When in doubt, a photo sent to an electrician costs nothing and takes minutes.
What can I do if my house has no neutral wire in the switch box?
Four options, in rough order of practicality for a finished house. First, smart plugs: zero wiring, $8-20 each, and they cover lamps, which is most of what people want to automate first. Second, smart bulbs: $10-25 each, no wiring, but the fixture must stay powered, so the wall switch has to remain on. Third, a no-neutral dimmer: $50-80 per switch, installed in the existing box, best for the one fixture you actually dim, with LED load limits. Fourth, running a new cable to the box: $150-500 per switch box (illustrative, heavily dependent on access), which buys you every mainstream smart switch but only makes sense if walls are already open or an electrician is already on site for bigger work.
Can I install a smart switch myself?
If you have a single-pole switch, a confirmed neutral bundle, a ground, and enough box room, a careful homeowner can swap in a smart switch in under an hour - breaker off, tester confirmed, one wire at a time. Call an electrician instead when: the circuit is a three-way with wiring you cannot confidently trace, the house has aluminum branch wiring, the box has no ground, the existing wiring was modified by someone else, or you cannot get the device to sit flat because the box is overstuffed. A device swap is simple work; guessing at unfamiliar wiring is how simple work becomes a service call at best, and a hazard at worst.
Do smart home devices work during a power outage?
Mostly no, and this is the part people miss when planning. Smart switches, plugs, bulbs, hubs, and the Wi-Fi router all lose power with the house, so app and voice control stops even though the physical switches still work. Battery-powered devices survive: smart locks keep their keypad codes, and battery sensors and cameras keep reporting if their hub is still alive. The practical fix is a UPS on the router, modem, and hub - those devices draw only about 10-40W combined (illustrative), so a modest UPS keeps them online for hours and preserves remote monitoring. It is also worth favoring devices that work locally over cloud-only gear, so an internet outage does not take your lights with it.